Tuesday, May 29, 2012

Up-cycling

We often talk about Hoarders, the TV show, and our fears of seeing ourselves there. It's an irrational fear because Mr. Coco would never let that happen. No, we mean he'd never let them through the door. :)  (Joke!) We DO tend to be a bit pack ratty. As evidence, we offer this, from the depths of our studio:


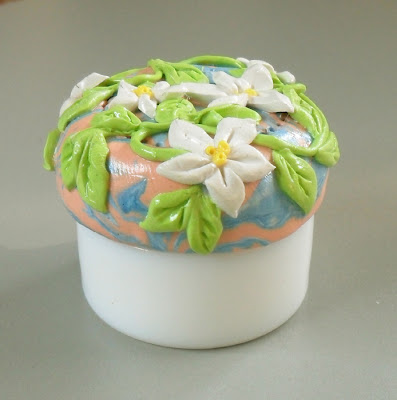
It's a perfectly good container made of glass (not plastic) with a metal lid (not plastic) that once held lip balm. It's tiny and doesn't take up much room so we figure why not put it aside to see what good might come of it? Right? You do it, too, don't you?

Well, here's what came of it once we applied a little polymer clay:


And just for the record, it has a new purpose in life. Can you guess what that might be? (Apart from being pretty, that is.)


We will never lose our thimble again.

Pack rats everywhere, unite!!


Sunday, May 27, 2012

Cats caught in the headlights


Several weeks ago, the local Humane Society was having a big fund-raiser flea market and bake sale. We were very excited and prepared to make some cookies to donate. We made 2 batches of lemon sugar cookie dough and stashed them in the freezer. Just before the day when we had planned to bake and decorate, we came down with that awful bug. We figured no one in his/her right mind would want germy cookies so we had to give up the whole idea. :(

Now, we have 2 batches of lemon sugar cookie dough on hand. We haven't made cookies in a while now. There just seem to be so many fun things to do each day. Without practice, it seems that cookie decorating is like everything else ... you get a little rusty. For what it's worth, these are our kitty cookies. If we were going to make these for a bake sale, we think we'd do a lot of things differently next time but for today, we're pretty sure, they'll taste just fine.

Friday, May 25, 2012

A girl can never have too many bags

Love Will Find Us
Copyright  © Cheryl Coville 2012
That's a quote from Kate and we agree wholeheartedly. We love bags. We love them for holding all the projects we have on-the-go at any given moment. We have one that's very special to us because Stephanie made it and she made a sweet label that she stitched inside. The fabric she used features cats and mice because she knows how much we love cats. (Mice?...not so much.) We keep all our quilting templates in that one and always know where to find them.

Not too long ago, our friend Karen told us about Spoonflower. Yesterday, we got a little envelope in the mail from them. We put one of our drawings on fabric and sent for a couple of test swatches to see how they look for real. (It's one thing to see them on the monitor and quite another to see them on fabric.) Spoonflower allows you to buy an 8 inch test square so we ordered one of each. The cool thing is that 8 inches is useable!!

This morning we decided we'd take the day to play. (So, what else is new?) And we made ourselves a knitting project bag from Love Will Find Us. SO MUCH FUN!!! It shouldn't even be legal. The second fabric swatch is a variation with white lettering. Both fabrics are now available for sale since we've seen and approved them.


The really interesting thing is that last week when we were at Taylor's Sewing Centre (our favourite local quilt shop) we fell deeply in love with the flowered fabric in the photo. It was on sale and it didn't take too much convincing for Cheryl to let Grandma Coco have it. We didn't have a project in mind for it. We just liked it. And, look! It's perfect for this bag.


Wednesday, May 23, 2012

Purple Prose


Beaded Micro Macramé Bracelet.
Purple with gold accents, about 8 inches long. 
The round purple beads are glass with lovely gold swirls.


Tuesday, May 22, 2012

A Toque for Paddy

There's nothing worse than a summer cold so when Paddy complained that his head felt chilly, we felt honour-bound to do something about it. We don't want him getting sick after all. We expect his little friends could use a nice, warm toque, too. Just in case you find yourself with a hat-less monkey, here's how we made ours ...


Paddy’s head is 8 ½ inches around.

You will need some leftover sock yarn and a set of 4 double-point needles in size 3.5mm (4US).

Cast-on 44 stitches. Join in the round and knit 1 ½ inches of K2, P2 ribbing.

Switch to stockinette stitch by knitting every round. Reduce 2 stitches somewhere in the first round. Continue knitting evenly until work measures 3 inches from the cast-on edge. 

Decrease for the crown:
Rnd 1: * K5, K2tog, rep from * to end.
Rnd 2: Knit
Rnd 3: * K4, K2tog, rep from * to end.
Rnd 4: Knit
Rnd 5: * K3, K2tog, rep from * to end.
Rnd 6: Knit
Rnd 7: * K2, K2tog, rep from * to end.
Rnd 8: Knit
Rnd 9: * K1, K2 tog, rep from * to end.
Rnd 10: Knit
Rnd 11: * K2tog, rep from * to end.

Cut the yarn leaving a 10-inch tail. Thread the tail on a darning needle and draw the tail through the remaining stitches. Draw up tightly and fasten. Pull the tail to the inside of the toque and make a pompom. (Monkeys like pompoms.)

Pompom:
Cut a piece of cardboard about 3 inches long x ¾ inch wide. Holding a 6-inch length of yarn along the long edge of the cardboard, wind yarn around the cardboard for about 100 wraps. Keep the yarn bunched up in one spot, as much as possible. Tie a secure knot with the two ends of the 6-inch length of yarn and cut the ends of wrapped yarn opposite the tied side. Trim your pompom to get a nice round look. Use the yarn you tied your pompom with to secure it to Paddy’s toque.

If you need more pompom help, just google them. There are lots of tutorials all over the internet.

As we mentioned before, the monkey itself is the brain-child of Anita Wilschut and the pattern can be found at  http://www.ravelry.com/patterns/library/jacobus   It's a great design. (And, no, we don't get a kick-back for saying that. It's just the truth.)

If you'd like to download a .PDF of A Toque for Paddy, just click here. We're working on more PaddyWear. You can find our pattern for his backpack here.

Paddy’s Toque Pattern Copyright © Cheryl Coville 2012
You're welcome to use our pattern for your own amusement and if you want to sell Paddy Toques (and good for you if you find a market for them!) feel free to do that as well. However, please don't reproduce the pattern for distribution in any form. Oh, and as with all our designs, please be sure to give us credit. That's only fair.




Monday, May 21, 2012

The gift of Second Sight

This week's Illustration Friday prompt is "sight".

Copyright © 2012 Cheryl Coville 
When we were kids, we used to hear a lot about people with "second sight". It was widely believed that our great-grandmother had it. Second sight is the ability to perceive things that others can't ... a sort of extra-sensory perception that allows you to see the future. For a while, we remember thinking we had inherited the gift. Stranger things have happened. However, all we really managed to achieve was a nasty phobia about riding in the car. 

As a young adult, starting out in life, we had a car that was pretty much running on life support. Every time we got in that heap to go any farther than the grocery store, we had visions of tow trucks and failed brakes and fiery crashes. Somehow, we managed to conflate these images of dread with our so-called psychic abilities and ended up with severe anxiety that's taken years to overcome.

Knews for Knitters

After we wrote about the heroics of our Mr. Coco, we heard from others about their men-folk. One wanted to borrow him for training purposes (and we are in negotiations right now about that). We did hear from some who already have well-trained thoughtful spouses. Kate's husband is an example. He found this link and brought it to her and she shared it with us. (We hope he was suitably praised and rewarded for his good behaviour.)

If you're a knitter, you'll find the Knitting as Programming article very interesting (even if you're like us and don't know much about computer programming). In the body of the article is a link to a Youtube video on Guerilla Knitting. If you have the time, it's a great video and well worth watching. 

We don't need to be followers on this knitting adventure. We can set ourselves free and let our creativity soar. 


Sunday, May 20, 2012

Cool and Sophisticated


We bought this beautiful bead last November 
at Rideau Art Beads in Kemptville, Ontario. 


It`s been waiting for just the right project.

Part of the fun of working with beads is finding a bead here, a bead there
and having them all come together in their own good time.


Saturday, May 19, 2012

Three Cheers for Mr. CoCo

This is the long weekend that kicks off the summer season here in the Kingdom and, as usual, the countryside is alive with garage and yard sales. We know many people find these sales appealing but we generally avoid them lest we find ourselves in an episode of Hoarders.

However, this morning after his tennis game, Mr. CoCo found himself with time on his hands and a yard sale beckoning. He moseyed over to see what was on offer. This is what he brought home:


For all of $5. including the storage container. Hail the conquering hero! It's full of quilting cotton! and some of it still sports price stickers from a local (now out-of-business) quilt shop.

Even Cassie was impressed.


Friday, May 18, 2012

With fresh eyes

We have such lovely visitors here in the Kingdom and many of them leave thoughtful and helpful comments. One of them is Maria who suggested we put the last bracelet away for a day or 2 so we could see it clearly with fresh eyes. What a great idea! We do that routinely with our drawings.


There's something in our brains that wants to make sense of things. Unfortunately, that part of our brain can sometimes get in the way by not allowing us to see things as they really are. So, we sent the green bracelet off for a tiny time out. When he emerged, calmer and contrite, we could see right away it wasn't the choice of colours or even the choice of beads. It was the placement.


The little, yellow beads were just lost in that great chasm between the focal beads and the large white beads.
See the difference?
Now, the yellow beads can shine. The focal beads are ones we made from polymer clay. They are vibrant and joyful. This is a bracelet for someone who is happy! A bracelet for a celebration. It measures 7 3/4 inches long, with a beaded loop and a single glass bead for the closure.

Thank you to everyone who offered input. We appreciate your comments.


Wednesday, May 16, 2012

Baby Steps

We have our WhirlyGiggle quilt all ready and we're determined to quilt it by machine ... and not in straight lines either. We really want to learn to do this Free Motion stuff we see everybody else doing. Every time we get ready to start, we chicken out, it seems. We set our machine up for free motion and test drove the spare block we had leftover. Oh, boy, the learning curve is steep. And we are so very unforgiving of ourself.   (In truth, Grandma Coco doesn't see what all the fuss is about. It's Cheryl who's dragging her feet.)

We finally dug out a UFO that we started a while ago. We planned a quilt-as-you-go quilt. We like quilt-as-you-go but we have to admit it was a sort of stop gap measure between hand-quilting and actually getting the hang of machine quilting (which seemed pretty much unattainable back then).


We've already flip-flopped around on this one. We started out machine quilting with the feed dogs up, starting and stopping and pivoting as needed. Very time consuming. We did a little hand-quilting on a small frame which was actually the frame for an artist's canvas. Good idea but ... Very time consuming. Result? UFO. And now we all know why. So, now that we've got a little of this and a little of that anyway, why not go all the way and use these blocks to practice our FMQing on?

Say Cheese Copyright  © 2012 Cheryl Coville


So, here's the deal. There are 11 hand appliquéd, hand embroidered Say Cheese cat blocks and 1 hand appliquéd portrait of our long-ago dog, Daisy. These will alternate with 12 scrappy patchwork blocks to form a quilt 56 1/4 inches x 60 inches. The animal blocks will all have one backing fabric and the scrappy blocks will have a coordinating backing so the back of the quilt will be a checkerboard.

Daisy Copyright © Cheryl Coville 2012
That sounds like a plan. Off we go. Any words of wisdom will be gratefully received. 


Linking up to the Needle and Thread Network again. 
Check out all the great Canadian craftspeople.


Monday, May 14, 2012

Advice needed


Sometimes the beads seem to choose themselves. Sometimes they just don't want to cooperate. We're not sure about this one. The colours in this photo are pretty much spot on (on our monitor). Would love to hear what you all think. Is it the yellow that's just not strong enough? Hmmmm....


Sunday, May 13, 2012

Some pretty things

Apple blossoms under a perfectly blue May sky


Flower cookies for a friend


A spring-inspired bracelet


Saturday, May 12, 2012

Say "Hello" to Paddy!

Cassie's been feeling a little low since all the monkeys went to their new homes. This being an only child isn't what it's cracked up to be.


Fortunately, when she got up this morning, this little fellow was waiting for her.

"Hey, sleepyhead! What took you so long!"

He says his name is Paddy. What's he wearing? Why, a backpack, of course. How else would he carry all his belongings?


If you've made a monkey from Anita Wilschut's pattern and he needs a backpack, here's how we did ours.

You can use our template, if you'd like. Cut one from felt or felted wool or maybe even polar fleece (anything that won't fray) and cut 2 straps that measure 1/2 inch x 7 1/2 inches.  We used an ordinary paper punch to punch the holes that you see on the template.


We cut some wool about 36 inches long, took the 2 cut ends in our left hand and twisted it with our thumb in the mid-point. Twist, twist, twist until there's a fair amount of twisting going on. Take both ends of this twisted piece and put them together to make a nice cord. Knot both ends and feed it through the holes just like in the photo.

Position the straps as shown and fold on the line on the template (It's about 4 inches from the bottom.) with the right sides together. Stitch along both sides with a very narrow seam allowance. 

Next, square off the corners of the bottom of the backpack just like you would for a purse. Stitch about an inch from the corner.


Turn the backpack right side out and feed the cord through the paper punch hole in the top. The tension of the fabric will keep it closed. No buttons to worry about with little kids ... or monkeys.

And that's it! A backpack for a little scamp of a monkey to keep his stuff in. Oh, and did you notice what he was sitting on? That's our WhirlyGiggle quilt!!! We bet he's the one who has hidden our safety pins.


~ Just monkeyin' around,

Friday, May 11, 2012

Ravelry and Craftsy stuff

Ravelry is running a contest right now to celebrate their 5th anniversary. They asked for design submissions for an image to put on a project bag. This is our entry:


There are a LOT of very good designs in the running. If you're signed up for Ravelry, you can choose your favourite until May 14th at midnight EST.

As well, over on Craftsy ...
We've uploaded a .PDF of our Corduroy Roads Socks. It's freeeeee! Help yourself, if you'd like.


Thursday, May 10, 2012

Finishing the Corduroy Roads Sock

AND, we're back! To the Corduroy Roads Sock, that is.

Detail: The Heel (being a ribbed stitch, the heel flap is slightly stretchy)


Now, where were we? Oh, yes. We'd just turned the heel and reduced at the gusset to finish the foot on the same number of stitches we had for the leg... 60 for the large size OR 54 for the small size.

Detail: The Cuffs (with their fabulous tubular cast-on)


We continue to knit round and round until the foot measures 6 inches from the edge of the heel flap (where we picked up stitches for the foot) for the large size OR 4 inches for the small size. This will give us a finished foot length of approximately 10 inches for the large size OR 8 inches for the small size. If you're following along and you need to adjust for a slightly shorter or longer foot, do it now.

We're going to do a Round Toe which is our (current) favourite toe treatment. The instructions, in this case, are the same for either size.

Rnd 1: * K4, K2Tog, rep from * to end of round.
Rnds 2-5: Knit
Rnd 6: * K3, K2Tog, rep from * to end of round.
Rnds 7-9: Knit
Rnd 10: * K2, K2Tog, rep from * to end of round.
Rnds 11 & 12: Knit
Rnd 13: * K1, K2Tog, rep from * to end of round.
Rnd 14: Knit
Rnd 15: *K2Tog, rep from * to end of round.

For large size only, next round: (K1, K2Tog) 3 times, K1.

Cut the yarn leaving a 10 inch tail and draw the tail through all the remaining stitches. Pull up tight and fasten. Darn in all the ends.

Two Full Pairs!


That's it! Thank you for helping us get our second sock completed. They have already been claimed by Mr. Coco (who knows a handsome sock when he sees one.)


We can't shake the feeling that there's much more to explore on the heel flap of the simple sock.